Have you ever loved a sweatshirt, only to feel frustrated when the design fades or doesn’t match your style anymore? Don’t worry; you’re not alone! Knowing how to safely remove prints from a sweatshirt can breathe new life into your favorite piece of clothing. Whether it’s an outdated logo or a graphic that no longer resonates, this guide will walk you through the essential steps to restore your sweatshirt’s fabric while preserving its quality. With the right techniques and a bit of care, you can customize your wardrobe effortlessly, allowing you to express your style and creativity. Dive in as we explore effective methods to take prints off sweatshirts and unlock new possibilities for your casual wear!
Understanding Different Print Types on Sweatshirts
Understanding the various types of prints used on sweatshirts is essential for anyone looking to remove designs safely and effectively. From classic screen printing to modern digital heat transfers, the method used can significantly impact how a print reacts to attempts at removal. Each type of print has unique characteristics, durability, and levels of adhesion to the fabric, which can lead to varying results when you try to take them off.
Types of Prints
- Screen Printing: This traditional method involves forcing ink through a mesh screen onto the fabric. While it creates vibrant and durable prints, it adheres firmly to the material, making removal more challenging.
- Heat Transfers: Often used for intricate designs, heat transfer prints involve a special material that is pressed onto the fabric using heat and pressure. They can be somewhat easier to remove but may leave residue.
- Direct-to-Garment (DTG): This digital printing method applies ink directly onto the sweatshirt. DTG prints are usually softer and more integrated into the fabric, which can make removal simpler compared to other techniques.
- Puff Prints: For a 3D effect, puff printing uses a special ink that expands when heat is applied. While visually striking, this method can be messy during removal, often resulting in fabric damage if not done carefully.
Understanding these differences not only equips you with the knowledge to make informed choices about print removal techniques but also helps you in future hoodie purchases and customization efforts. Consider the type of print when planning any alterations or DIY projects; it can save time, preserve fabric integrity, and lead to better overall results. Whether you’re wanting to refresh your wardrobe or rescue an old favorite, knowing what you’re working with is key!
Essential Tools for Safe Print Removal
To embark on the journey of print removal, having the right tools is essential for a successful outcome. Equipping yourself with the proper implements not only makes the process easier but also helps safeguard your sweatshirt’s fabric during the removal. Here’s what you’ll need to ensure a smooth operation in your quest to refresh or redesign your favorite sweatshirt.
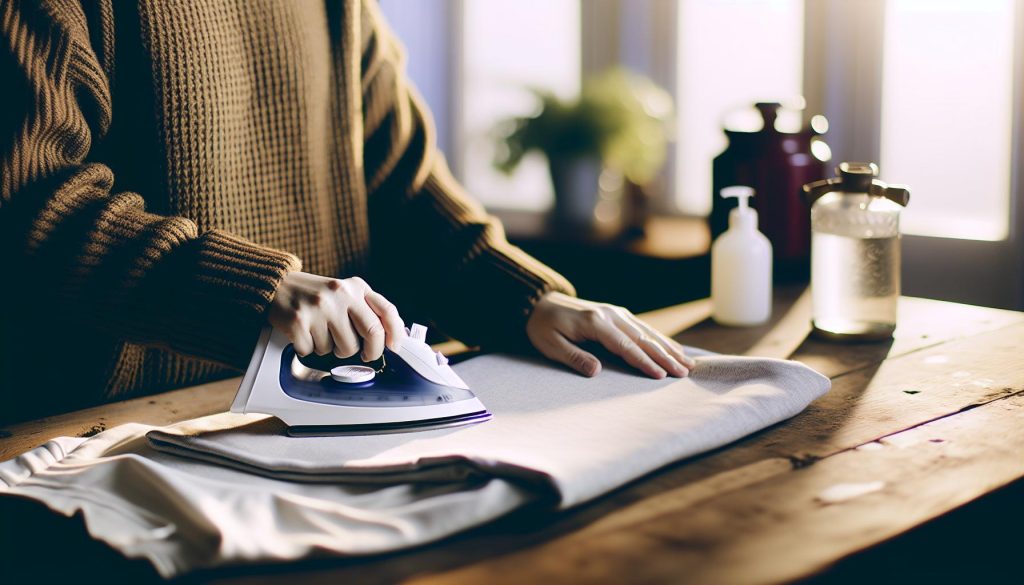
First on the list are heat-resistant tools. A reliable heat gun or an iron is crucial, as many prints require some heat application for softening adhesive. Make sure to use a press cloth, such as a clean cotton towel or an old t-shirt, to protect the fabric from direct heat, preventing scorch marks and damage. Don’t forget a pair of fine tweezers or a plastic scraper – these will help you lift stubborn print edges without risking tears in your sweatshirt.
Next, gather some solvents that are safe for fabric. Isopropyl alcohol or specialized print removal solutions can work wonders in breaking down prints without harming the fabric fibers. It’s wise to conduct a patch test on an inconspicuous area first to ensure compatibility with your sweatshirt’s material. Adhesive removers designed for fabrics can also be very effective in loosening stubborn prints.
A few other handy items include paper towels for blotting and cleaning, and a small bowl to hold your solvents. If the print is especially stubborn, you might want to have some white vinegar or baking soda on hand, both of which are excellent for breaking down residues left by print materials. Always wear rubber gloves during the process to protect your hands from chemicals and ensure better grip while working.
With these tools in your arsenal, you’ll be well-prepared to tackle any print removal challenge without compromising the integrity of your beloved sweatshirt. Remember, patience is key! Taking your time with each step will yield the best results, and soon you’ll have a clean canvas ready for your next DIY project or a fresh wardrobe revival.
Step-by-Step Methods to Remove Prints
To successfully remove prints from a sweatshirt without damaging the fabric, following a systematic approach can make the process straightforward and effective. Begin by carefully selecting the right method based on the print type and the fabric of your sweatshirt. Whether you’re dealing with a screen print, heat transfer, or vinyl design, tailored removal techniques will ensure you achieve the best results.
Start by preparing your workspace and gathering your essential tools. Lay your sweatshirt on a flat, heat-resistant surface. If you’re using a heat gun or an iron, ensure it’s set to a low heat setting to prevent scorch marks. Place a press cloth over the print-this cloth protects the fabric while heat is applied. Gradually warm the print by moving your heat source in circular motions across the design for about 15-30 seconds. The aim here is to soften the adhesive, which will make it easier to peel off.
Once the print is warm and pliable, use your plastic scraper or fine tweezers to gently lift an edge of the print. Start from the corner and carefully pull while applying even pressure. It’s crucial to do this slowly to avoid tearing the fabric. If you find the print is still sticking, reapply heat for a few seconds and try again. For stubborn prints, applying a small amount of fabric-safe adhesive remover around the edges can help loosen the grip of the print.
After the print has been successfully removed, it’s time for some post-removal care. Wash the sweatshirt according to the fabric care instructions, preferably in cold water with a mild detergent, to clean any residual adhesives. This step is crucial to restore the fabric’s integrity and prepare it for any further customization or use. Once dry, consider how you can refresh or upcycle your sweatshirt into a one-of-a-kind piece. The options are endless, from creating a tie-dye masterpiece to adding new fabric patches-let your creativity shine!
DIY Techniques for Customizing Your Sweatshirt
Bringing your sweatshirt back to life can be a delightful adventure, especially after you’ve removed an old print. Customizing your sweatshirt not only adds a personal touch but also transforms it into a unique statement piece that reflects your style. Whether you’re looking to create a cozy companion for lounging or an eye-catching garment for outings, a few DIY techniques can help you revamp your sweatshirt in fun and engaging ways!
One popular method is the tie-dye technique, which allows your creativity to flow in vibrant, swirling colors. Start by gathering some fabric dye in your chosen colors, along with rubber bands and gloves. Simply twist, fold, or scrunch your sweatshirt and secure it with rubber bands to create different patterns. Dip each section in different dye colors, rinse it while still tied up, then let it dry. Voilà! You’ve transformed a plain sweatshirt into a trendy, colorful piece that’s perfect for any casual outing.
Another excellent approach is to utilize embroidery or fabric appliqué to add texture and character. You can stitch on fun patches or create your own designs using colorful thread. If you’re new to embroidery, start with simple shapes or letters. Use a small hoop to keep the fabric taut, and practice basic stitches that can create beautiful designs. Not only will this enhance the look of your sweatshirt, but it can also be a calming and satisfying project.
Additional Customization Ideas
- Faux fur trims: Add a cozy touch by sewing or gluing faux fur around the hood or sleeves.
- Pocket upgrades: Incorporate fabric patches or patterns to create unique pockets with flair.
- Fabric paint: Use fabric markers or paint to create original artwork right on the fabric. Get creative with stencils or freehand designs!
These customization techniques not only breathe new life into your sweatshirt but also allow you to express your individuality. Remember to wash your customized garment in cold water to keep those bright colors and handcrafted details looking their best. Let your imagination run wild and enjoy customizing your sweatshirt into something truly one-of-a-kind!
Tips for Preserving Sweatshirt Fabric Integrity
Maintaining the integrity of your sweatshirt fabric is essential for longevity, comfort, and style, especially when you’ve recently removed a print. The right care ensures that your beloved piece stays soft, vibrant, and structurally sound. One of the primary tips is to always follow the manufacturer’s care instructions, which can often be found on the tag. This helps you avoid mishaps like shrinking, fading, or pilling, prolonging the life of your sweatshirt.
When washing your sweatshirt, utilize cold water instead of warm or hot, as this helps preserve colors and fabric integrity. The cold setting is gentler on fibers, preventing unnecessary wear and tear. Choose a mild, biodegradable detergent that is less likely to cause chemical damage, and avoid bleach unless you’re specifically aiming for a distressed look. To further protect the fabric, consider turning your sweatshirt inside out before washing. This method minimizes abrasion from other clothes and the washing machine drum during the cycle, maintaining the fabric’s texture and color.
Drying is another critical aspect to consider. Whenever possible, air dry your sweatshirt instead of using a dryer. The heat from dryers can break down fibers over time and may contribute to shrinkage. Hang it up in a well-ventilated area; using a clothesline or a drying rack works wonders. If you must use a dryer, opt for the lowest heat setting and remove the sweatshirt while it’s still slightly damp to reduce the risk of damage.
Investing in proper storage also contributes significantly to fabric integrity. Fold your sweatshirt rather than hanging it, which can cause stretching in the shoulders. Ensure it is stored in a cool, dry place away from direct sunlight to prevent fading. Additionally, avoid packing away your clothing too tightly as this can also cause unwanted creasing and wear over time. By being mindful of washing, drying, and storage techniques, you can enjoy your sweatshirt for many seasons to come, allowing you to express your unique style while ensuring its lasting appeal.
Troubleshooting Common Print Removal Challenges
Removing prints from a sweatshirt can sometimes feel like navigating a maze, especially when you’re eager to restore your favorite piece of clothing. While many people love the versatility and comfort of hoodies, they may encounter challenges when trying to lift prints or designs. Whether it’s a stubborn screen print or a vinyl decal, understanding how to troubleshoot these common obstacles can save you time and frustration.
Firstly, you may find that the method you choose doesn’t yield the desired results. For instance, while heat is often an effective means to loosen prints, applying too much can scorch the fabric. It’s essential to use a variety of methods, including household items such as vinegar or baking soda, which can break down adhesives. Mistakes happen-if a print starts to fade or peel unevenly, try using an iron set to a low heat, placed over a cloth to control the temperature more effectively. This allows more precise heat transfer, helping to release the print without damaging the underlying fabric.
Sometimes, print removal may affect the texture or color of the sweatshirt. To avoid uneven patches or discoloration, make sure to pre-test your chosen removal method on a small, inconspicuous area. This simple step can prevent potential disasters and give you confidence in your approach. If you’re facing a particularly resilient print, consider combining methods. For example, use a mixture of rubbing alcohol and warm water to pre-treat the area before applying heat-often, the combination is stronger than either method alone.
Lastly, don’t be discouraged if you encounter a setback. If a print proves too stubborn, remember that the process can take time and patience. After attempting removal, if results are less than perfect, you can always get creative! Incorporate embroidery or patches to cover any mishaps, turning a challenge into a unique design feature that adds character to your garment. Embrace the journey of customization, and know that every sweatshirt can tell a new story through your personal touch.
Post-Removal Care: Reviving Your Sweatshirt
Reviving a sweatshirt after print removal is as much about restoration as it is about creativity. Once you’ve successfully lifted the unwanted design, the next step is to breathe new life into your garment and ensure it remains a cherished part of your wardrobe. Whether through careful washing practices or innovative customization, your sweatshirt can look just as good-if not better-than before.
Start with a gentle wash. Even after print removal, the remaining fabric may still carry residue or discoloration. To maintain its integrity, wash your sweatshirt in cold water with a mild detergent, avoiding harsh chemicals that might further strip its color. Utilizing a garment bag during the wash can protect it from stretching or snagging, especially if you decide to add any embellishments later, like tie-dye or embroidery. This extra step helps to ensure your sweatshirt retains its shape for years to come.
Once cleaned, consider applying a fabric conditioner to enhance softness and give the sweatshirt a fresh feel. If you notice any areas that are a bit rough or discolored post-print removal, you can use an iron on a low setting (with a cloth barrier) or a fabric shaver, which can help smooth out any remnants of the print and restore a polished look. This can be a delightful opportunity to infuse your unique style-think about incorporating custom patches or fabric paint to hide stubborn spots, turning what was once a challenge into a chic statement.
Lastly, when your sweatshirt is looking fresh, remember to set it up for longevity. Store it properly by folding rather than hanging it to prevent stretching. If you plan on personalizing your sweatshirt further, researching patterns and techniques can lead to exciting projects. From applying tie-dye patterns to adding interesting embroidery, each customization can transform your recently revived piece into something uniquely yours. Embrace the creative possibilities and enjoy the satisfaction of crafting a truly one-of-a-kind garment!
Creative Upcycling Ideas for Old Sweatshirts
There’s something inherently satisfying about transforming an old, worn-out sweatshirt into a fresh piece that’s uniquely your own. Upcycling not only breathes new life into your clothing but also embraces sustainability-keeping those comfy garments out of landfills while showcasing your creativity. After you’ve safely removed unwanted prints, consider these exciting ways to elevate your sweatshirt game.
One fantastic approach is to turn your sweatshirt into fashionable lounge-wear. Cut the sleeves off for a trendy sleeveless look or crop the bottom for a stylish crop top that pairs perfectly with high-waisted jeans or leggings. Adding some fringes along the hem or sleeves can introduce an edgy flair that feels both modern and playful. For extra coziness, think about sewing on a soft fleece lining or adding a hood if you’re feeling adventurous; this can transform a basic sweatshirt into a versatile staple.
Another creative upcycling idea is to embellish your sweatshirt. Fabric paint, stencils, or embroidery can all be fantastic avenues to express your personality. Crafting a new design, whether it be a motivational quote or an intricate pattern, allows you to truly make the piece your own. You could even involve some patchwork by sewing on colorful patches that contrast with the base color of the sweatshirt, giving it a vintage vibe that’s both trendy and uniquely you.
If you’re looking for a more functional transformation, consider converting your sweatshirt into useful items such as pillow covers or tote bags. Simply cut and sew sections of the fabric to create a cozy pillow that matches your living space. For a tote, use the body of the sweatshirt, cut off the sleeves, and reinforce the seams for a durable yet stylish carryall. This not only reuses the fabric but also provides practical utility in your daily life.
Lastly, don’t underestimate the power of a color change. You can revitalize your sweatshirt with a fun tie-dye project or a bleach technique. These methods offer a vibrant, artistic way to update the garment and make it stand out. Plus, the process is usually quite simple and can be a fun activity to share with friends or family.
Embrace the spirit of creativity and sustainability. Each upcycling project allows you to redefine your style while having fun with your fashion. Whether you’re crafting something new from scratch or simply giving an old sweatshirt a second chance, the results can be extraordinary and uniquely yours!
Expert Advice on Avoiding Print Damage
Protecting the integrity of your sweatshirt during and after print removal is crucial, especially if you want to maintain its original fabric and shape. Delicate screen prints and designs can easily fall victim to mishandling-leading to unwanted damage, fading, or even tearing. One of the best ways to avoid such issues is to handle your garment with care. Always start by checking the washing instructions on the care label; this will provide insights into the safest temperature and cycle to employ, especially when preparing for removal.
When approaching print removal, tools matter. Invest in gentle solvents specifically designed for fabric care to reduce the risk of damaging the underlying material. For example, using a heat source like an iron can soften the print, making it easier to peel off, but it’s essential to place a cloth barrier between the iron and the fabric to prevent scorching. Here’s how to proceed effectively:
- Test First: Always conduct a patch test on a small, inconspicuous part of the sweatshirt to ensure that your method won’t cause discoloration or damage.
- Use Gentle Heat: If using an indoor iron, keep it on a low setting. If the sweatshirt is too hot, the fibers can get damaged.
- Peel Carefully: As you remove the print, do so slowly to avoid stretching or tearing the fabric.
It’s also wise to consider the timing of these cleaning processes. For instance, never leave your sweatshirt in direct sunlight for extended periods after removing a print; UV rays can hasten fading. When removing prints, always wash the garment gently in a cold cycle afterward and skip the dryer; air-drying prevents additional stress on the fabric.
In adopting these careful practices, you not only preserve the quality of your favorite sweatshirt but also extend its lifespan, allowing you to enjoy its cozy comfort for many seasons to come. Embrace these expert tips as a part of your fabric care routine, empowering you to keep your sweatshirts looking fabulous while maintaining their unique character!
Comparing Home Remedies vs. Professional Services
When it comes to removing prints from your beloved sweatshirt, you may find yourself at a crossroads between choosing DIY home remedies or enlisting professional services. Each option has its pros and cons, making it essential to evaluate which route aligns best with your needs, comfort level, and the specific print you’re dealing with.
Embarking on a DIY journey can be both satisfying and cost-effective. Home remedies often utilize common household items like vinegar, baking soda, or acetone. For example, applying heat through an iron combined with parchment paper can effectively lift certain types of prints without damaging the fabric underneath. This route lets you flex your creative muscles, as you can experiment with different techniques and see what works best for your particular sweatshirt. However, keep in mind that achieving results may require patience and might not guarantee success, especially with stubborn prints or sensitive fabrics. It’s always a good idea to conduct a patch test first to prevent discoloration or damage.
On the flip side, professional services can offer specialized tools and expertise that might save you the hassle of trial and error. Many dry cleaners or fabric restoration services are equipped to handle various fabric types and print techniques, ensuring a higher likelihood of achieving pristine results without harming the garment. This option not only saves time but also gives you peace of mind, knowing that a professional is managing the delicate process. However, professional removal often comes at a price, and availability can vary based on location.
Ultimately, choosing between home remedies and professional services depends on your specific circumstances. If you’re dealing with a cherished sweatshirt that you want to preserve at all costs, seeking a professional may be the wisest choice. However, if you’re in a playful mood and love experimenting with DIY techniques, tackling the print removal process yourself can be both rewarding and fun. Whichever route you choose, the key lies in handling your hoodie with care and always prioritizing its fabric integrity.
Maintaining Your Sweatshirt After Print Removal
After successfully removing prints from your sweatshirt, maintaining its condition is essential to ensure it remains a cozy staple in your wardrobe. Proper care not only helps preserve the fabric’s integrity but also revives the sweatshirt’s overall look, letting you enjoy it for many more seasons.
To begin with, always wash your sweatshirt carefully. Turn it inside out to protect the fabric from friction during washing and to help maintain its color. Use cold water and a gentle cycle to minimize wear. Avoid using bleach, which can weaken fibers, and instead, opt for a mild detergent to keep the fabric soft and vibrant. When it’s time to dry, skip the dryer; hang your sweatshirt to air dry. This method prevents shrinkage and helps retain the original fit.
### Reviving the Fabric
Similarly, if the fabric looks a bit lackluster after print removal, consider these rejuvenating techniques:
- Fabric Softener: Occasionally using fabric softener during the wash can enhance softness.
- Pilling Removal: Use a lint roller or a fabric shaver to tackle pilling and keep your hoodie looking fresh.
- Iron with Care: If you need to iron your sweatshirt, use a low heat setting. Place a thin cloth between the iron and fabric to protect it.
### Styling and Customizing
Once your sweatshirt is looking great, feel free to personalize it! Create a unique piece with DIY embellishments. Simple projects like adding embroidery, patches, or fabric paint can breathe new life into your favorite hoodie. Additionally, if you love a playful vibe, try tie-dyeing or adding iron-on transfers that reflect your style.
Caring for your sweatshirt after print removal is a rewarding practice that allows you to enjoy and express your style confidently. Whether you’re watching a movie or heading out with friends, keeping your sweatshirt in tip-top shape ensures it remains the ultimate comfort wear for all occasions.
How to Prevent Prints from Fading or Peeling
To maintain the fresh look of your sweatshirt and prevent prints from fading or peeling, a proactive approach to care and washing is essential. Prints can enhance the style of any hoodie, yet they can be vulnerable to factors like harsh washing methods and improper drying techniques. By adopting a few simple practices, you can keep your designs vibrant and intact, ensuring your favorite sweatshirt looks its best for longer.
One of the most effective ways to safeguard your prints is to wash your sweatshirt inside out. This practice minimizes the friction that occurs during the wash cycle, protecting the print from the agitation that can cause it to wear down. Always choose cold water and a gentle cycle, as warmth can cause fabrics and prints to break down more quickly. For detergents, opt for mild, non-toxic options to maintain both your sweatshirt’s fabric integrity and the vibrancy of its print.
After washing, skip the dryer to let your sweatshirt air dry naturally. Heat from dryers can not only lead to shrinking but can also cause prints to crack and peel. Instead, lay your sweatshirt flat or hang it on a drying rack, ensuring that it retains its shape while avoiding any distortion that might result from hanging it by the shoulders. If you do need to iron your sweatshirt, do so on a low setting, using a cloth between the iron and the fabric to protect your print from direct heat.
By embracing these simple yet effective care techniques, you’re not just preserving your sweatshirt – you’re prolonging your enjoyment of it. Keeping your prints looking vibrant and fresh also opens the door to creativity; once you’ve mastered the art of care, consider adding your personal touch with DIY embellishments or projects to refresh your style! Whether you’re lounging at home or ready to hit the streets, you can wear your hoodie with confidence, knowing it showcases your unique personality.
FAQ
Q: What is the best way to remove heat transfer vinyl from a sweatshirt?
A: To remove heat transfer vinyl, use a combination of heat and adhesive remover. Carefully apply heat using a hairdryer to soften the vinyl, then gently peel it off. If leftover residue remains, apply adhesive remover and scrub gently. Always test on a small area first to prevent damage.
Q: Can I use acetone to remove prints from a sweatshirt?
A: Yes, acetone can be effective in removing prints, but it should be used cautiously. Apply a small amount on a cotton ball and dab it on the print. Rinse immediately with cold water to avoid damaging the fabric. Always check the fabric type to ensure it’s acetone-safe.
Q: How do I safely remove screen print from a sweatshirt?
A: To safely remove screen print, heat the area with an iron set to low (with a cloth between the iron and print). This softens the ink. Once warm, gently scrape off with a credit card. Follow up with a fabric-safe solvent to clean any remaining residue.
Q: Are there any home remedies for print removal?
A: Yes, a popular home remedy is using vinegar or baking soda mixed with warm water. Soak a cloth in the mixture, then apply it to the print for several minutes before gently rubbing it off. Test on a hidden area to ensure fabric compatibility.
Q: What should I avoid when removing prints from a sweatshirt?
A: Avoid using harsh chemicals like bleach, which can damage fabric. Overheating can also scorch or melt synthetic fibers. Always check fabric care labels and conduct tests on inconspicuous areas before proceeding with any removal method.
Q: How can I remove puff ink prints from sweatshirts?
A: Puff ink prints can be tricky to remove due to their texture. First, use a heat tool to soften the ink. Then, carefully scrape it away with a blunt knife and use a solvent to lift any remaining bits. Always perform a spot test to protect the fabric.
Q: Is it better to remove prints myself or hire a professional?
A: It often depends on the print type and personal comfort. DIY methods can save money and be effective, but complex prints may risk damaging the fabric. For valuable or sentimental items, hiring a professional might be safer to ensure care and expertise.
Q: How can I prevent future prints from sticking to my sweatshirts?
A: To prevent print sticking, always wash sweatshirts inside out, use cold water, and avoid high heat in the dryer. Choosing high-quality prints that are professionally done can also help maintain fabric integrity and longevity over time.
Key Takeaways
Now that you know how to safely remove designs from your sweatshirt, it’s time to unleash your creativity! Remember, this process not only refreshes your favorite piece but can also transform it into a unique canvas for new designs or customizations. Don’t wait-gather your supplies and give your sweatshirt a makeover today!
If you found this guide helpful, explore our related articles on DIY hoodie customization and stain removal tips for more inspiration. And for those who want to keep their hoodies looking fresh, check out our guide on washing and care instructions. Your hoodie deserves the best, and we’re here to help!
Don’t forget to share your results with us in the comments below or tag us on social media-we’d love to see your creative transformations. Stay comfy and stylish!


