Did you know that custom sweatshirts not only express your personal style but also make wearable memories? Whether you’re looking to stand out at a gathering or cozy up in a uniquely designed piece, there’s something incredibly satisfying about creating your own sweatshirts. This guide dives into DIY design ideas and techniques, empowering you to unleash your creativity. From selecting materials and mastering measurements to exploring trendy customization methods like tie-dye and embroidery, you’ll learn how to make a statement that’s all your own. Plus, we’ll cover important care instructions to keep your creations looking fresh. So grab your sweatshirt, and let’s transform it into a canvas of self-expression! Keep reading to discover how to elevate your casual wear with flair and personality.
Choosing the Right Sweatshirt for Customization
When embarking on the journey of customizing a sweatshirt, selecting the right base is crucial for achieving the desired results. Not all sweatshirts are created equal; they vary in fabric, fit, and finish, impacting both the ease of customization and the final look of your design. A soft, high-quality cotton blend, for instance, offers not just comfort but also excellent printability and fabric paint adherence, making it a popular choice among DIY enthusiasts.
Consider the structure of the sweatshirt as well. Look for options with sturdy seams and durable construction, especially if you intend to introduce heavy embellishments such as embroidery or patches. Hoodies that include features like drawstrings or kangaroo pockets can also provide unique customization opportunities, allowing for added creativity in design placement or detailing. Additionally, pay attention to the fit-oversized or relaxed styles can serve as a blank canvas for bold designs, while fitted sweatshirts may offer a sleeker silhouette for more refined customization.
Before making a purchase, it’s wise to consider the color. Neutral tones like black, white, or grey are versatile and allow for vibrant designs to stand out, whereas pastel shades can create a softer look. Each color behaves differently with fabric paints, dyes, and transfers, so think about how your chosen method will interact with the sweatshirt’s material. Don’t forget to check the care instructions; knowing how your sweatshirt will react to washing and wearing is essential for maintaining your customized creation over time.
In summary, choosing the ideal sweatshirt for customization revolves around fabric quality, construction details, fit, and color options. By keeping these factors in mind, you can ensure that your DIY design ventures turn out exactly as you envisioned, empowering you to express your unique style through comfortable and creatively tailored apparel.
Essential Tools for DIY Sweatshirt Design
Creating your own customized sweatshirts can be an incredibly fulfilling experience, allowing you to express your unique style and creativity. To embark on this colorful journey, equipping yourself with the right tools is essential for achieving the best results and enjoying the process. From the basics to the more specialized instruments, here’s what you’ll need to elevate your DIY sweatshirt design game.
One of the first and most important investments you can make is a quality set of fabric paints or markers. These products come in various colors and finishes, enabling you to bring your designs to life. Look for non-toxic, washable options that adhere well to fabric; this will ensure your artwork stays vibrant even after multiple washes. A good set of brushes in various sizes will also help you achieve different effects in your painting, from fine details to bold strokes.
Essential Tools for Embellishment
If you’re planning to add some flair through embroidery or appliqué, you’ll need a few extra tools. An embroidery hoop is invaluable for keeping your fabric taut while you work, making stitching much easier. Pair it with a set of embroidery needles and threads in fun colors to personalize your designs. Additionally, fabric scissors with a sharp edge will allow you to cut your materials cleanly, essential for achieving that professional finish.
For those who lean towards the graphic design side, consider investing in a heat press or iron. These tools serve multiple purposes, such as applying heat transfer vinyl or iron-on decals to your sweatshirts. Choose a reliable cutting machine, like a Cricut or Silhouette, for making intricate designs and shapes with various media, including vinyl and cardstock. With these devices, you can create personalized logos, quotes, and artwork like a pro.
Caring for Your Custom Creations
Once you’ve spent time crafting your masterpiece, it’s crucial to care for it properly. Make sure to read the care labels of your chosen sweatshirt to follow the recommended washing instructions. Generally, washing your custom piece inside out and in cold water can help preserve the integrity of your designs. Avoid fabric softeners, as they can break down paint and vinyl, and opt for air drying to keep your customized sweatshirt looking fresh.
By arming yourself with these essential tools and tips, you’ll be well on your way to creating stunning, personalized sweatshirts that showcase your individuality. Whether you’re flipping through fabric paint colors or deciding between embroidery threads, your custom creations are sure to standout in style. Happy crafting!
Creative Techniques for Customizing Your Hoodie

Imagine slipping into a hoodie that not only fits perfectly but also reflects your personal style! Customizing your hoodie is a fantastic way to express creativity and make a statement. There are various techniques that add flair and individuality, transforming a basic piece into a true standout. Whether you’re an aspiring artist or a DIY enthusiast, there’s a technique to suit everyone’s skill level and taste.
One popular method is tie-dye, which allows you to create vibrant, swirling patterns using dye and elastic bands. Simply gather your materials-fabric dye, rubber bands, and gloves-and twist or fold sections of the hoodie before applying dye. The exciting part? No two pieces will ever look the same! If you prefer a more controlled approach, stenciling is a great option. Choose your favorite design or phrase, create a stencil, and use fabric paint or spray to apply it to your hoodie. This method allows for precision and is especially rewarding for those who enjoy graphic designs.
For those looking to add a touch of texture, consider embroidery. With just a needle and thread, you can embellish your hoodie with unique designs, initials, or favorite quotes. An embroidery hoop can help keep your fabric taut while you work, ensuring clean stitches and professional results. Alternatively, using iron-ons or heat transfers can achieve a polished look with minimal effort. With a heat press or an iron, you can easily attach pre-designed letters or images to add personalized flair without the need for extensive skills.
Lastly, don’t forget the importance of upcycling! Transform that old, faded sweatshirt into a unique piece by cutting it up and repurposing the fabric into patches, different neckline styles, or even combining fabrics with other garments for a mixed-media masterpiece. Embrace your creativity, and remember that customizing your hoodie isn’t just about aesthetics-it’s about making it truly yours. Happy crafting!
Mastering Tie-Dye: Step-by-Step Guide

The vibrant world of tie-dye is not just a nostalgic blast from the past; it’s a creative expression that continues to thrive in today’s fashion scene. Imagine enveloping yourself in a hoodie that bursts with color and individuality, an embodiment of your personal style. Mastering the art of tie-dye is easier than it seems, and with a few simple techniques, you can transform a plain sweatshirt into a stunning piece of wearable art.
To kick off your tie-dye adventure, gather the essential materials: fabric dye in your chosen colors, rubber bands or twine, gloves to protect your hands, a spray bottle or squeeze bottles for precise application, and plastic wrap or sealed plastic bags for dye setting. Start by prepping your hoodie-wash it beforehand to remove any sizing agents, and keep it damp for better dye absorption. Once you have everything ready, choose your tie-dye technique. Here are a few popular methods to consider:
- Spiral Technique: Pinch the center of the hoodie and twist it to create a spiral. Secure it with rubber bands, keeping the fabric tightly wound. Apply different colors in sections along the spiral for a mesmerizing effect.
- Bullseye Technique: Pull fabric up from different points along a straight line and band those sections tightly. This technique creates distinct circular designs that can showcase vibrant color contrasts.
- Crinkle Technique: Scrunch the fabric randomly and secure it with rubber bands. This method yields a beautiful, textured pattern that blends and swirls hues in an organic way.
After applying your colors, cover your masterpiece with plastic wrap and let it sit for at least 6-8 hours (or overnight) to let the dye develop. The longer you wait, the more intense the colors will be! Once the dyeing process is complete, rinse your hoodie under cold water until the water runs clear. Finally, wash your creation separately in cold water with a gentle detergent to ensure no surprise color bleeding occurs, and then air-dry or tumble dry on low to maintain the vibrancy of your design.
With tie-dye, every piece is unique, just like you! So unleash your inner artist and enjoy the rewarding process of creating custom sweatshirts that reflect your personality and style. Happy dyeing-embrace the colors and have fun!
Embroidering Your Unique Style on Sweatshirts

Embroidering your sweatshirts is a delightful way to express your individuality while adding a touch of texture and sophistication to your wardrobe. Unlike other customization techniques, embroidery offers a unique tactile quality that can transform a basic hoodie into a statement piece. Whether you prefer a minimalist logo or a bold design spanning the front, embroidery provides endless possibilities, combining creativity with practicality.
To start your embroidery journey, the first step is to gather the essential tools: an embroidery hoop, needle, embroidery floss (or thread), scissors, and a fabric marking pen. These items will help you achieve professional-looking results. Begin by choosing a design that resonates with your personal style; this could be a simple monogram, a favorite quote, or even intricate floral patterns. Once you have your design in mind, use the fabric marking pen to sketch it lightly onto your sweatshirt, ensuring you position it where you want the embroidery to shine.
Step-by-Step Embroidery Technique
- Set Up Your Hoops: Place the sweatshirt in the embroidery hoop, ensuring the area you plan to stitch is taut. This is crucial for maintaining even tension while stitching.
- Threading the Needle: Cut a length of embroidery floss-usually about 18 inches is a good starting point. Separate the threads if you want a finer look or keep them together for a bolder effect. Thread your needle and tie a knot at the end.
- Stitching: Start stitching using various techniques such as straight stitches, back stitches, or satin stitches, depending on your design. For beginners, running stitches are straightforward and versatile, allowing for quick progress.
- Finishing Touches: When you’ve completed your design, secure the thread from the underside and trim any excess. Remove the hoop and gently press your sweatshirt with an iron to set the fabric and smooth out any wrinkles around the embroidered area.
Embroidered sweatshirts not only showcase your artistic flair but also make great gifts. Personalizing a hoodie for a friend or a loved one adds a special touch that store-bought items simply can’t replicate.
Lastly, keeping your embroidered sweatshirts looking fresh requires some care. Always wash them inside out in cold water to preserve the thread and colors. Consider air drying when possible to avoid any potential heat damage from the dryer. With the right approach, you’ll create a meaningful piece that reflects your unique style while keeping the cozy comfort of your favorite hoodie. Celebrate the art of embroidery-it’s more than just a craft; it’s a way to wear your personality with pride!
Using Iron-Ons and Transfers for Easy Designs
There’s something undeniably satisfying about transforming a plain sweatshirt into a vibrant expression of your personality with the help of iron-ons and transfers. These techniques are not only straightforward but also allow for endless creativity, making them perfect for both beginners and seasoned DIY enthusiasts. Whether you’re looking to rock a graphic from your favorite band, a clever quote, or even a piece of personal artwork, iron-on designs can be applied quickly and easily, ensuring that your sweatshirt reflects your unique style.
To get started, you’ll need to gather a few essential materials: iron-on transfer paper, your chosen design or image (printed or drawn), a pair of scissors, a piece of cardboard or a thick cloth to place inside the sweatshirt, and of course, an iron. First, ensure that your design is prepared correctly: if you’re using a computer-printed image, make sure to reverse it so it transfers correctly onto the fabric. After cutting out your design, place it on your sweatshirt where you’d like it to be displayed. To protect the fabric, lay a thin cloth over the design before applying heat. This prevents direct contact between the iron and the transfer, safeguarding both the image and the fabric from unintended damage.
Tips for Successful Application
- Temperature Check: Always use the appropriate heat setting recommended on the transfer paper package-too hot can burn the fabric, while too cool may prevent the design from adhering properly.
- Even Pressure: Apply steady pressure on the iron, moving it in a circular motion for even heating. This guarantees that the entire design adheres smoothly.
- Cooling Time: Allow the transfer to cool down completely before peeling off the backing. This avoids tearing the design or lifting it prematurely.
- Finishing Touch: Once the transfer is secure, you might want to add an extra layer of fabric on top and give it a gentle press to firmly set the design.
Iron-ons not only save time compared to sewing or embroidering designs but also lend a polished look to your custom projects. Plus, the whole process can be a fun group activity-invite friends over, share designs, and create custom pieces that everyone can wear! Remember that taking care of your customized sweatshirt is crucial for longevity; wash it inside out and avoid high heat when tumble drying to keep your designs intact. With these tips in mind, you’re ready to elevate your sweatshirt game and wear your art with pride!
Upcycling Old Sweatshirts: Sustainable Style Solutions

When it comes to fashion, upcycling old sweatshirts not only offers a way to express your creativity but also reduces waste and promotes sustainability. Rather than letting your favorite sweatshirt languish at the back of your closet or, worse yet, end up in a landfill, why not transform it into something uniquely yours? This not only breathes new life into fast-fading garments but also allows you to showcase your individuality in a way that’s both environmentally friendly and stylish.
One of the easiest approaches to upcycling is to alter the fit or style of your sweatshirt. If it’s oversized, consider cutting it into a cropped version or creating a distressed look by fraying the hem. You could also add exciting details like lace or fabric patches to the elbows for a trendy, vintage feel. Even adding a trendy drawstring with vibrant colors can instantly change the vibe of your sweatshirt. Don’t hesitate to experiment with tie-dye techniques as well-using various colors, you can create stunning patterns that make each piece truly one-of-a-kind.
Transformative Techniques
- Cutting and Fraying: Use fabric scissors to achieve different lengths, making the garment more fashionable.
- Patching: Sew on patches or fabric squares to cover up any holes while adding personalized flair.
- Embroidery: Stitch your initials, a favorite quote, or special motifs to give your sweatshirt a unique touch.
- Fabric Paint: Use fabric paint to add designs or messages that speak to your personality.
You might also consider turning your old sweatshirt into a versatile tote bag or pillow cover. By cutting it and sewing the sides together, you can craft a fashionable accessory while giving that sweatshirt a functional second life. If you’re feeling especially adventurous, why not host a DIY upcycling party with friends? It’s a fun way to bond while being creative, and you can trade ideas and supplies, making it a community affair.
By embracing the art of upcycling, you not only extend the life of your beloved sweatshirts but also contribute to a more sustainable fashion culture. So dive into your closet, gather those forgotten pieces, and let your creativity run wild-your wardrobe will thank you, and the planet will too!
Tips for Effective Personalization with Fabric Paint
Fabric paint is not just a medium; it’s a powerful tool for self-expression and creativity that allows you to transform any plain sweatshirt into a vibrant piece of art. Whether you want to add a splash of color, create intricate designs, or make a bold statement, fabric paint offers limitless possibilities for customization. To get the most out of your fabric painting experience, it’s essential to follow a few tips that will help ensure your designs turn out beautifully and last through frequent washes.
First and foremost, preparation is key. Before you start painting, wash your sweatshirt to remove any sizing or finishes that could interfere with the paint adhering properly. Once dried, lay your sweatshirt flat on a sturdy surface, and consider placing cardboard or a thick piece of paper inside the sweatshirt to prevent paint from bleeding through. Choose fabric paints specifically designed for clothing to ensure durability and washability; these paints are often washable and will maintain their vibrancy over time.
When it comes to applying the paint, think about using a variety of tools to achieve different effects. Paintbrushes are great for detailed designs, but you can also experiment with sponges, stamps, or even spray bottles for broader strokes or patterns. If you’re unsure about a design, sketch it lightly with a fabric pencil first to map out your vision. This can help you avoid mistakes and gives you a clear guide to follow. Moreover, applying multiple layers of paint can enhance vibrancy; just be sure to let each layer dry thoroughly before adding more.
Lastly, to ensure the longevity of your masterpiece, set the paint according to the manufacturer’s instructions-this often involves heat-setting it with an iron once dry. Always wash your customized sweatshirt inside out in cold water, and avoid fabric softeners as they can affect the painted areas. With these tips, you’re well on your way to creating stunning, personalized sweatshirts that not only reflect your style but also stand the test of time!
Caring for Your Customized Sweatshirt: Washing Guide
Even the most creatively designed sweatshirts need proper care to keep them looking fresh and vibrant. After all, the time and effort you put into customizing your hoodie should be reflected in how well you maintain it. Washing customized sweatshirts may seem straightforward, but there are important tips and tricks that can help preserve your art and extend the life of your favorite garment.
Start by washing your customized sweatshirt inside out. This simple step protects your designs from friction and abrasion caused by the washing machine. Use cold water to prevent colors from fading and to help maintain the integrity of any fabric paint, embroidery, or iron-ons you’ve applied. Avoid fabric softeners and bleach; while they may seem helpful, they can affect the paint’s adhesion and vibrancy over time. If possible, opt for a gentle cycle on your washing machine to further minimize wear and tear.
Once you’re done washing, hang your sweatshirt to air dry whenever possible. This not only prevents shrinkage but also keeps your designs intact. If you need to use a dryer, choose a low-heat setting to safeguard your creations. Always refer to the manufacturer’s instructions regarding care-especially if you’ve used specialty materials or embellishments-to ensure you’re not accidentally compromising your design.
For those moments when stains do occur, quick action is key. Blot the stain with a clean cloth and use a stain remover compatible with your fabric type. Always test the remover on a small, inconspicuous area first. When treating any stained areas, make sure not to rub too hard, as this can damage your customization efforts. And remember, if you’re in doubt, it’s always a good idea to hand wash the affected area to maintain control over the fabric and details.
By integrating these care practices into your routine, you’ll not only extend the life of your hoodie but also preserve the unique expressions of art that make your custom sweatshirt a personal statement and cherished piece of your wardrobe. Happy wearing!
Stain Removal Hacks for Colorful Custom Designs
Stains can be a custom designer’s worst nightmare, especially when dealing with colorful sweatshirts that you’ve meticulously crafted. But don’t fret! With a little knowledge and quick action, you can restore your vibrant customs to their full glory, ensuring they remain a standout in your wardrobe.
When it comes to tackling stains on your custom designs, the key is to act swiftly. Here’s a step-by-step approach to efficiently manage those pesky marks:
Quick Stain Management
- Blot, Don’t Rub: Gently blot the stain using a clean cloth or paper towel. Rubbing can damage the fabric and disturb any design elements you’ve added.
- Choose the Right Remover: Use a stain remover that is compatible with the fabric of your sweatshirt. Always read the label-it’s especially important to avoid harsh chemicals that may affect dyes or paints.
- Test First: Before applying any stain remover, test it on a small, inconspicuous area of the fabric. This ensures it won’t cause discoloration or damage.
- Follow Directions: Apply the remover as per package instructions. Often, letting the solution sit for a few minutes will effectively break down the stain.
Specific Stain Solutions
Not all stains are created equal, so here are tailored solutions for common culprits:
| Stain Type | Method |
|---|---|
| Food Stains | Sprinkle baking soda on the stain to absorb grease; then treat with a gentle stain remover. |
| Ink Stains | Dab with rubbing alcohol on a cotton ball before rinsing with cold water. |
| Paint Stains | Use a solvent-based remover. Work from the outside edge in to avoid spreading. |
| Grease Stains | Apply corn starch to absorb excess grease, then treat as above. |
For stubborn stains, don’t hesitate to resort to a gentle hand wash for precise control. Create a solution of mild detergent and lukewarm water, and softly agitate the stained area before rinsing thoroughly. After treating, air-dry your sweatshirt to maintain the integrity of your designs.
By being proactive and using the right strategies, you can keep your colorful custom sweatshirts looking fresh and vibrant for every occasion. Stains might be a part of life, but they don’t have to take away from the creativity and love you poured into your DIY projects. Wear your unique designs with pride, knowing that you have the tools to restore their brilliance!
Layering and Styling Your Custom Sweatshirts
Layering your custom sweatshirts can elevate your style while keeping you cozy and comfortable. There’s something timeless about a well-styled hoodie that effortlessly blends fashion and functionality. The beauty of layering lies in its versatility: not only can you create dynamic looks, but you can also adapt your outfit for different seasons or occasions, showcasing your unique designs and craftsmanship.
One effective way to layer is to mix textures and lengths. For instance, you might combine a cropped denim jacket with an oversized hoodie, allowing the stylish bulk of the sweatshirt to peek out. This creates a fashionable contrast and highlights your customization. Consider button-ups or long-sleeve tees under your hoodies for a chic, casual vibe-think of plaid flannels or solid color basics to maintain a clean look. Be sure to play around with colors that complement your sweatshirt’s design; for instance, if you’ve tie-dyed a bright sweatshirt, you might want to layer it over a neutral-toned shirt to keep the focus on your unique piece.
Accessorizing is another key element in styling your sweatshirts. Combining hats, scarves, or jewelry can add a personal touch to your outfit. For example, beanies or snapbacks paired with a graphic sweatshirt broadcast a youthful, urban aesthetic. Chunky sneakers can ground your look, while sleek ankle boots can dress it up just enough for an outing with friends. Don’t forget about the little details-fun socks peeking out from high-top shoes can add an unexpected flair.
Lastly, keep in mind the practicality of your outfit. For chillier weather, a long trench coat or puffer will not only keep you warm but also add a sophisticated layering piece to your ensemble. Utilize drawstrings and zippers on your sweatshirts to adjust for comfort and style. If your customization includes graphic elements or intricate embroidery, position them strategically so they’re visible and displayed beautifully, allowing you to showcase your creativity wherever you go.
By mastering layering and combining your custom sweatshirts with other articles of clothing, you can effortlessly create outfits that stand out and reflect your personality. Whether you opt for bold contrasts or subtle harmonies, the goal is to blend comfort with creativity, ensuring your unique designs remain the centerpiece of your ensemble.
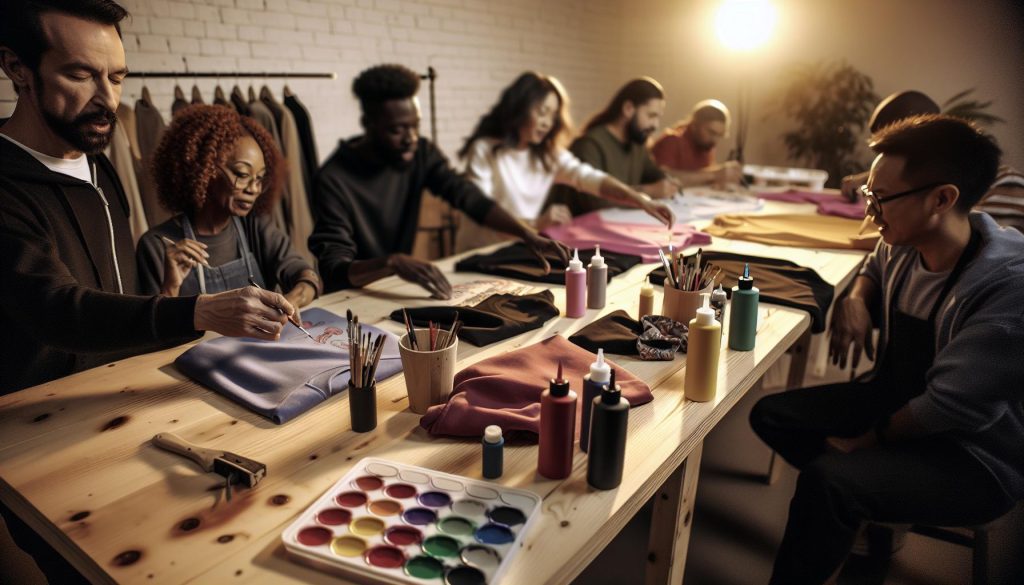
Showcase Your Creativity: Share Your DIY Projects
There’s something incredibly rewarding about bringing your own creative vision to life through DIY sweatshirt projects. Whether you’re a seasoned crafter or a beginner, personalizing your hoodie offers a unique way to express your style and personality. Sharing your DIY creations not only inspires others but also creates a community of like-minded individuals who appreciate the art of customization.
When showcasing your projects, consider documenting the entire process. Take photos while you create, from selecting materials and tools to finalizing your design. You can create a step-by-step series on social media or a blog to engage your audience. Use creative hashtags related to your work, such as #DIYSweatshirt or #CustomHoodie, to reach a broader community and connect with fellow enthusiasts who might share similar interests.
Here are a few ideas to get you started on sharing your creativity:
- Host Workshops: Organize DIY sweatshirt-making sessions in your community or online. You can guide participants through techniques like tie-dying, embroidery, or using iron-on transfers, encouraging them to add their touch to their sweatshirts.
- Create Tutorials: Record video tutorials demonstrating specific techniques or hacks. For instance, you could show how to create a unique tie-dye pattern or share tips for effective use of fabric paint.
- Online Challenges: Challenge your friends or followers to customize a sweatshirt using a specific theme or color palette. Encourage them to document their process, fostering a collaborative spirit of creativity.
- Brand Your Creations: If you’re considering turning your DIY projects into a business, think about creating a logo or brand that reflects your style. Sharing your designs can also attract customers who appreciate unique and personalized fashion.
Finally, don’t just stop at sharing your creative journey; engage with your audience. Ask for feedback, encourage questions, and be open to suggestions. The more you interact, the more your community will grow. Remember, every DIY project is a learning experience, so embrace the journey and celebrate not just the outcome but the creativity and effort you put into making your custom sweatshirts truly unique!
Frequently asked questions
Q: What materials do I need to start making custom sweatshirts?
A: To make custom sweatshirts, gather materials such as a plain sweatshirt, fabric paint, stencils or vinyl for designs, embroidery thread, and any embellishments like patches. Don’t forget essential tools like scissors, an iron, and transfer paper, which can be found in the “Essential Tools for DIY Sweatshirt Design” section of your main article.
Q: How can I personalize my sweatshirt without sewing?
A: You can personalize your sweatshirt without sewing by using fabric paint or iron-on transfers. Simply apply the designs using stencils or pre-made graphics, and make sure to follow the instructions for setting the paint or transfers to ensure durability. Check the “Using Iron-Ons and Transfers for Easy Designs” section for more detailed steps.
Q: What techniques can I use to create mixed media designs on sweatshirts?
A: Mixed media designs can include combining fabric paint, embroidery, and embellishments like buttons or patches. Layering these elements creates texture and visual interest. Refer to the “Creative Techniques for Customizing Your Hoodie” section for inspiration and guidelines on integrating diverse materials.
Q: How do I choose the right sweatshirt fabric for customization?
A: Opt for cotton or cotton-blend sweatshirts for better paint adhesion and comfort. Look for pre-washed fabrics to prevent shrinkage and warping of designs after washing. You can find more on selecting suitable fabrics in the “Choosing the Right Sweatshirt for Customization” section of your article.
Q: What are some ideas for upcycling old sweatshirts?
A: Upcycling can involve cutting sweatshirts into trendy crop tops, adding fabric patches, or repurposing them into tote bags. Personalize with tie-dye or embroidery to give new life to worn-out garments. The “Upcycling Old Sweatshirts: Sustainable Style Solutions” section has innovative ideas for transforming old pieces.
Q: How do I ensure my customized sweatshirt lasts after washing?
A: To ensure longevity, wash the sweatshirt inside out in cold water and hang it to dry. This protects the design from fading and cracking. For detailed care instructions, check the “Caring for Your Customized Sweatshirt: Washing Guide” section for best practices.
Q: What common mistakes should I avoid when customizing sweatshirts?
A: Avoid overloading your design with too many elements, which can look cluttered. Ensure you pre-wash the fabric before customizing to prevent shrinking. The “Tips for Effective Personalization with Fabric Paint” section provides additional insights into ensuring a successful customization job.
Q: Where can I find inspiration for custom sweatshirt designs?
A: Inspiration can be found from various sources such as social media platforms like Pinterest and Instagram, where DIY projects are frequently shared. The “Showcase Your Creativity: Share Your DIY Projects” section encourages sharing ideas and gathering inspiration from others in the crafting community.
Final Thoughts
Now that you’re equipped with fantastic DIY design ideas and techniques for making custom sweatshirts, it’s time to unleash your creativity! Remember, the beauty of custom sweatshirts lies in making them truly yours-whether through personalized designs, unique tie-dye patterns, or fun embroidery. Don’t wait to start your crafting journey; the perfect hoodie is just a project away!
If you found this guide helpful, check out our articles on Hoodie Care Guides and Styling Tips for Sweatshirts to keep your creations looking fresh and fabulous. For further inspiration, join our newsletter for exclusive tips and DIY resources directly in your inbox!
Your hoodies deserve the best, so take the plunge into customization today. Share your creations with us in the comments below, and don’t forget to connect with our community for more trendy ideas. Happy crafting, and remember-every sweatshirt you make is a reflection of your unique style!


