We all have that one sweatshirt that’s seen better days but still holds a special place in our hearts. Why not breathe new life into it with a DIY distressing technique? In just a few simple steps, you can transform a basic piece into a trendy, vintage-inspired statement that reflects your unique style. Not only does this project allow for creativity, but it also aligns with the growing movement towards sustainability in fashion. Instead of buying new, distressed clothing, you can customize what you already own, saving money and reducing waste. Whether you’re aiming for a subtly worn look or an edgy, ripped aesthetic, this guide will provide you with everything you need to know. So, grab those scissors and a little bleach, and let’s dive into the exciting world of sweatshirt distressing!
How to Choose the Right Sweatshirt for Distressing

Choosing the right sweatshirt for distressing is crucial to achieving that perfect vintage look. Not every fabric and cut will yield the same results, so being selective is key to a successful DIY project. Look for sweatshirts made from cotton or cotton-blend fabrics; natural fibers tend to distress beautifully, allowing for more fraying and fading over time. Fabrics with a softer texture will also be easier to manipulate, making the process of creating that worn-in look much simpler.
When evaluating sweatshirts, consider both the fit and the style. A relaxed or oversized fit often lends itself better to a distressed aesthetic, providing you with ample room to create unique cuts and styles without compromising comfort. Opt for crew necks or hoodies with minimal embellishments; plain designs serve as a blank canvas for your creative touch. If you enjoy showcasing different styles, choose sweatshirts with different sleeve lengths or cuts to vary your distressed looks.
Additionally, pay attention to the color of your sweatshirt. Light-colored or faded options are excellent for achieving a vintage appearance since they can easily take on the rougher edges of distressing without appearing too stark. Once you’ve chosen the right sweatshirt, you’re ready to gather your tools and dive into the exciting world of DIY distressing to create a unique piece that’s entirely your own!
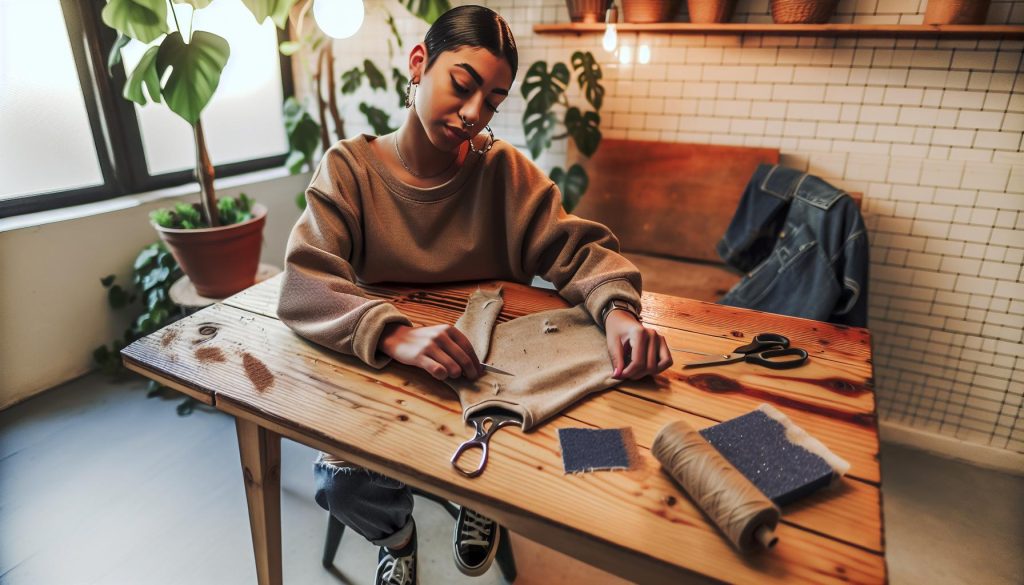
Essential Tools and Materials for DIY Distressing

To dive into the creative world of DIY distressing and bring your sweatshirt visions to life, you’ll need a few essential tools and materials. Having the right kit not only simplifies the process but also enriches your overall experience, allowing you to achieve that coveted vintage look with ease.
First and foremost, gather your core tools: a pair of sharp fabric scissors for clean cuts, a razor blade or box cutter for precise distressing effects, and a fine-tooth comb or sandpaper to help fray the edges. Don’t forget a pair of gloves to protect your hands while you work and various attachments like embroidery thread or patches if you want to add extra flair post-distressing. Always keep a ruler or measuring tape handy to measure your cuts accurately; this helps maintain consistency across your designs.
In terms of materials, it’s vital to choose the right ones that will enhance your distressing process. Start with your chosen sweatshirt-preferably a cotton or cotton-blend fabric, as these materials hold up well against distressing techniques. Consider using a spray bottle filled with water or fabric distressing spray to help you achieve the desired fade effect, especially on darker colors. Optional materials can include fabric paint or dye for adding custom designs post-distressing or stencils for more controlled patterns.
With these tools and materials laid out, you’re now fully equipped to craft a uniquely distressed sweatshirt that reflects your personal style! The process not only allows for creativity and self-expression but also connects you to a larger community of hoodie enthusiasts who appreciate the art of customization. Embrace the journey, and don’t hesitate to experiment to find what styles and techniques work best for you!
Step-by-Step Guide to Distressing Techniques
Creating a beautifully distressed sweatshirt is an enjoyable process, allowing you to blend creativity with comfort. The right techniques can make your sweatshirt feel like a vintage treasure in no time. Here’s how to master the art of distressing step by step.
First, start by prepping your sweatshirt. Lay the garment flat on a stable surface. It’s wise to consider the look you want to achieve-do you prefer subtle fraying or bold rips? Start by using fabric scissors to carefully cut small slits or holes at various locations. For a more controlled approach, try cutting at the seam lines where the fabric is already slightly weaker. Focus on areas like the cuffs, hem, and neckline for a naturally distressed vibe.
Next, to achieve a unique, worn-in look, employ a few distressing techniques. Razor Blades: Gently glide a razor blade across the fabric to create soft frayed edges, particularly effective on cuffs and necklines. Sandpaper or a Fine-Tooth Comb: Rub these across the fabric to wear down the surface, making it look well-loved. Try using the comb to tease out individual threads for a scraggly finish. If you’re feeling adventurous, Bleach can turn the ordinary into extraordinary. Mix bleach with water in a spray bottle and lightly spritz the surface for a faded look; test this on a hidden area first to gauge the effect on your fabric.
To finish off, incorporate some personal flair! Patchwork, embroidery, or even adding a fun design with fabric paint can elevate your sweatshirt’s uniqueness. For added depth, consider layering multiple distressing methods to create complexity in your design. Remember,
when it comes to distressing, less can be more-start with a few techniques and assess before adding more.
Finally, be sure to wash your new creation carefully to preserve its unique styling. Opt for cold water and a gentle cycle to maintain the integrity of the fabric and the distressing effects. Air drying is recommended to help your sweatshirt maintain its shape and prevent further wear from the dryer. By following these steps, you’re guaranteed to turn heads with your new DIY vintage sweatshirt!
Creative Methods for Achieving a Vintage Look

Creating a vintage look for your sweatshirt not only allows for personal expression but also transforms your casual wear into a statement piece that stands out. A distressed sweatshirt exudes character and nostalgia, making it a beloved staple in any fashion-savvy wardrobe. By employing creative distressing methods, you can customize your hoodie or sweatshirt to reflect your unique style while achieving that coveted, worn-in appearance.
One effective technique to enhance the vintage vibe is using bleach. By mixing bleach with water in a spray bottle, you can lightly mist areas of the fabric, creating a faded, sun-bleached effect. Be sure to test this solution on a hidden seam first to ensure you’re happy with the outcome. Another approach is to use sandpaper or a fine-tooth comb to wear down specific areas of the fabric. This method gently frays the edges, giving the appearance of years of wear. Focus on high-contact areas like the cuffs, hem, and neckline for a more authentic look.
To take your sweatshirt from basic to bold, consider adding personal touches such as patches or embroidery. Ironed or sewn patches can cover intentional small rips or stains while adding personality and color to your fabric. For a more intricately designed sweatshirt, embroidery is an excellent way to introduce artistic flair. These techniques can be layered, combining multiple distressing methods to create depth and visual interest.
Lastly, don’t forget that the way you style your newly distressed sweatshirt can amplify its vintage essence. Pair it with high-waisted jeans or a flowy skirt, layer it with a denim jacket, or accessorize with chunky boots. These choices will not only enhance the sweatshirt’s character but also elevate your overall look. Maintaining this customized piece is equally important; wash it in cold water on a gentle cycle and always air dry to preserve that unique aesthetic you worked hard to create.
Tips for Adding Unique Touches to Your Sweatshirt
Adding unique touches to your sweatshirt can transform it from a simple garment into a true expression of your personal style. Customizing your hoodie not only enhances its vintage aesthetics but also allows you to make it distinctly yours. From embellishments to fabric paints, there are countless ways to breathe new life into your beloved pieces.
One effective method is to utilize fabrics and patches. A simple iron-on patch can instantly elevate your sweatshirt, providing a pop of color and personality. Think of your favorite band logo, a whimsical design, or a quirky quote that resonates with you. You can also layer multiple patches for a more eclectic look or mix and match with different colors and textures. If you’re feeling adventurous, consider hand-embroidering designs along the sleeves or around the neckline. This craft adds a personal touch while showcasing your creativity; a simple floral or geometric pattern can make a world of difference.
Another fantastic way to personalize your top is through the application of fabric paint or tie-dye. Using fabric paint or markers, you can create custom designs, quotes, or even abstract artwork directly on your sweatshirt. Tie-dyeing is another fun option that not only infuses vibrant colors but also adds a retro flair. To achieve this, simply twist sections of the fabric and secure them with rubber bands before applying your dye. The result is a one-of-a-kind piece that stands out.
Lastly, don’t overlook the power of button and bead embellishments. Adding vintage buttons or colorful beads can dress up a basic sweatshirt instantly. You could sew buttons along the shoulder seams or create a unique bead pattern along the cuffs. This attention to detail can turn a standard hoodie into an eye-catching masterpiece that guests will admire.
As you embark on your customization journey, remember that the goal is to enjoy the process and revel in your unique creativity. With these ideas, your sweatshirt can become a canvas for your imagination, showcasing not only style but also personal stories and passions that make each piece one-of-a-kind.
Caring for Your Distressed Sweatshirt: Washing Tips

Ensuring your distressed sweatshirt remains a staple in your wardrobe requires a bit of specialized care. The charm of a distressed look is its unique character, but this can be compromised if not properly maintained during washing. Many might be surprised to learn that you can keep your stylishly worn-in favorite looking fresh with just a few simple guidelines.
First and foremost, always check the care label on your sweatshirt. This provides essential information regarding the recommended washing temperature and drying method. For most sweatshirts, a gentle wash is preferred. Use cold water to prevent shrinking and fading, and consider turning your sweatshirt inside out to protect the distressed details and any unique embellishments you’ve added.
Washing Tips:
- Use a mild detergent to avoid harsh chemicals that can degrade fabric.
- Wash on a gentle cycle to minimize wear and tear.
- Avoid using fabric softeners, as they can create a film on the fabric, affecting its breathability.
- When possible, use a mesh laundry bag to offer even more protection.
After washing, avoid the dryer, as the heat can alter the fabric’s structure and diminish the distressed look. Instead, hang your sweatshirt to air dry, which helps maintain its shape and texture. If your hoodie has lost some of its flair, a quick touch-up with sanding or distressing techniques can revive those unique features after washing.
Ultimately, caring for your distressed sweatshirt is about preserving its character while ensuring durability. By following these washing tips, you can confidently wear your favorite piece knowing it will stay looking its best for seasons to come.
Styling Your Distressed Sweatshirt for Maximum Impact
Nothing says comfort and style quite like a well-distressed sweatshirt. This beloved wardrobe staple exudes a cozy, lived-in vibe that’s perfect for any casual outing or lounging around at home. To truly make your distressed sweatshirt stand out, styling it correctly can elevate your look from ordinary to effortlessly chic. There are numerous ways to play up the unique character of your sweatshirt, allowing you to express your individual style while keeping comfort at the forefront.
Start with the basics: pair your distressed sweatshirt with a slim-fit bottom. Think high-waisted skinny jeans or tailored joggers to balance the bulkiness of the sweatshirt. This combination enhances your silhouette and emphasizes the casual yet stylish look of your top. For a more relaxed approach, choose wide-leg pants or shorts with a fitted tank underneath. Adding a simple graphic tee beneath the sweatshirt is another great way to layer and add dimension while keeping the focus on your favorite piece.
Accessorizing is key to making your distressed sweatshirt a true statement. Opt for bold jewelry-chunky necklaces or oversized earrings can add flair without overwhelming the look. Hats can also elevate your outfit; a classic baseball cap or a cozy beanie can enhance that laid-back vibe. Footwear is where you can get creative! Sneakers are an obvious choice, but ankle boots or even chic slides can transform your look to fit a variety of settings.
Lastly, don’t shy away from adding your personal touch. While the distressed look is inherently unique, consider customization options like patches or embroidery to showcase your personality even more. This not only adds a creative twist but also makes your sweatshirt one-of-a-kind. Embrace the layering approach by tossing on a denim jacket or an oversized blazer for an effortlessly thrown-together look.
Remember, the goal is to let your comfort shine while making sure your distressed sweatshirt remains the centerpiece of your outfit. With these styling tips, you’ll be ready to rock that vintage vibe and show off your DIY creation with pride.
Common Mistakes to Avoid When Distressing
When it comes to distressing your favorite sweatshirt, enthusiasm and creativity can sometimes lead to unintentional missteps. One common mistake is being too aggressive with cutting or fraying. While it’s tempting to go all out for that edgy vintage look, overdoing it can result in unsightly holes or a garment that’s unwearable. Instead, start slowly and build upon your distressing until you achieve the desired effect. It’s easier to add more distressing than to undo it!
Another miscalculation can happen during the selection of tools. Using inappropriate cutting instruments, like dull scissors or overly sharp blades, can lead to jagged edges or accidental injuries. Opt for tailor’s scissors or a fabric cutter designed for crafting. This lets you maintain control and precision, allowing you to achieve those chic frayed edges without overwhelming the fabric. Remember, the right tools make all the difference in achieving a polished DIY result.
Color Considerations
Color is another critical aspect that can be overlooked during the distressing process. Many DIY enthusiasts underestimate how bleach or dye can affect the fabric’s integrity. If you plan to use bleach for a faded look, be sure to do a patch test on a small area first. This ensures you’re not only pleased with the color but also that the fabric handles the chemical well without becoming too weak or damaged.
Ignoring Wash and Care Instructions
Finally, a prevalent error occurs when distressing enthusiasts disregard the care instructions of their garments post-project. Distressed sweatshirts require gentle washing to prevent further fraying or unraveling. Always wash in cold water on a delicate cycle, and consider air-drying to maintain your unique design. Neglecting these steps can lead to irreversible damage, thus diminishing all your hard work and creativity. By avoiding these common pitfalls, you can turn your sweatshirt into a piece of wearable art that reflects your personal style while retaining its functionality.
How to Repair Distressed Areas to Keep Your Sweatshirt Fresh
When it comes to maintaining the fresh appeal of your distressed sweatshirt, knowing how to repair any accidental wear or tear is essential. Distressing adds character to your garment, but sometimes it can get a little too adventurous, resulting in holes that may not align with your vision. Luckily, with a few straightforward techniques, you can restore its charm while keeping the vintage vibe intact.
Start by assessing the distressed areas. For small holes or frays, fabric patches can be a lifesaver. Choose a patch in a complementary color or a fun print that enhances the overall aesthetic of your sweatshirt. Simply sew or iron the patch in place, ensuring it blends with the distressed style you’ve achieved. If you’re feeling crafty, you can make your own patch using a scrap piece of fabric by fraying the edges to tie it into the overall distressed theme.
For larger holes, consider using a technique called “appliqué.” This involves stitching a piece of fabric underneath the hole, allowing it to peek through while still maintaining the distressed look. Use a zigzag stitch to give a more dynamic edge and secure the patch. Not only does this repair method fix the garment, but it also adds a new layer of texture and design, making your sweatshirt even more unique.
Stitching Techniques for Repairs
In some cases, you may find that simply stitching over distressed areas can enhance their appearance. If your sweatshirt has frayed edges that you wish to keep, use a sewing machine to apply a tight zigzag or straight stitch along the edge, securing the fibers in place while giving a polished touch. This will prevent further fraying while still keeping that laid-back look.
These repair techniques not only extend the life of your distressed sweatshirt but also allow you to inject your creativity into each repair. Remember, the goal is to maintain the balance between a casual, worn-in feel and fresh presentation. With these tips, you can keep your go-to sweatshirt stylish and ready for all occasions!
Inspiring Examples of Distressed Sweatshirt Designs
Creating a distressed sweatshirt offers you the chance to express your creativity while embracing a timeless, vintage vibe. The beauty of this DIY project is that the style options are nearly limitless. From subtle wear to bold, radical cuts, the only limit is your imagination.
One popular approach is to play with color in your distressing process. For instance, consider using a tie-dye effect before distressing. This can provide a fantastic base for your design. Once achieved, softening the sweatshirt with sandpaper or a pumice stone on specific areas can create a perfectly worn-in look that screams bohemian chic.
Another intriguing design idea is to focus on functional details. Adding eye-catching patches or appliqués can not only help to cover any unintentional holes but also become integral design elements. Choose patches featuring vintage logos or playful graphics that align with your personal style, then strategically place them over distressed areas to merge functionality with flair.
Consider also how the cut of the sweatshirt can enhance its uniqueness. Cropped styles with raw edges, for example, can add an edginess to your outfit, while oversized fits offer a laid-back feel. You could also incorporate fringing along the sleeves or hem for an added boho touch.
Lastly, don’t overlook the utility of text in your designs. Hand-stitching or using fabric paint to add a quote or a favorite motif can elevate your sweatshirt further. This not only personalizes your piece but creates a conversation starter, making it a unique addition to your wardrobe.
Each of these ideas can inspire your next DIY distressing project, transforming a basic sweatshirt into a statement piece that reflects your individuality and flair for style. Happy crafting!
Troubleshooting: Fixing Distressing Errors
Distressing a sweatshirt can feel like a journey into creativity, but sometimes that journey leads to unexpected results. Perhaps you accidentally made a tear too large or a fray got out of hand. No need to worry; every distressing mishap can be transformed into a style statement with a little ingenuity! Embrace the challenge and turn those errors into unique features of your new favorite piece.
One common issue is making holes that are too large or is not positioned well. This can be easily corrected by incorporating patches, fabric appliqués, or strategic embroidery. Choose patches that complement the aesthetic you’re aiming for, whether it’s a vintage graphic or a bold color pop. Be whimsical with your placement-overlap a patch on the misfit hole, or even embellish it further with stitching to create a cohesive design. This way, not only do you cover up the error, but you add a personalized touch that enhances your sweatshirt’s character.
If you’ve ended up with uneven fraying or cutting, consider transitioning this into a deliberate style. You can use scissors to create extra frays or tapered cuts in other areas, ensuring uniformity in your design. This technique can give your sweatshirt a deconstructed vibe that’s both trendy and intentional. Pair this with a torn hemline or frayed sleeves for an artisan touch.
Lastly, for those who might have gone overboard with bleach or color distressing, a creative solution is to turn to fabric dye to revitalize the fabric. You can balance out the discoloration or create an ombre effect to transition from a brighter to a darker shade, masking the uneven spots while adding depth to your design. For lighter fabrics, consider adding splashes or tie-dye patterns after sanding or distressing to incorporate diverse color elements that look fresh and artistic.
Whether you’re covering up mistakes or enhancing the natural wear, remember that imperfections can often lead to the most unique style choices. Experiment, have fun, and take pride in your one-of-a-kind distressed sweatshirt!
Frequently asked questions
Q: How do I create a distressed look on my sweatshirt at home?
A: To create a distressed look on your sweatshirt, start by choosing the right tools like scissors, sandpaper, and a bleach solution. You can distress the fabric by cutting, fraying, and adding bleach for a faded effect. For detailed techniques, refer to our step-by-step guide.
Q: What type of sweatshirt is best for distressing?
A: Cotton sweatshirts are ideal for distressing due to their durable fabric, which frays and ages well. Look for options with a bit of weight to them for easier manipulation and a better vintage appearance. Check out our article section on choosing the right sweatshirt for more tips.
Q: How can I bleach my sweatshirt safely while distressing it?
A: To bleach your sweatshirt safely, mix bleach with water in a spray bottle. Lightly spritz the areas you want to distress and allow it to react for a few minutes before rinsing. Always wear gloves and work in a well-ventilated space. Further safety tips are covered in our article on essential tools and materials.
Q: What are some creative ideas for customizing a distressed sweatshirt?
A: Beyond distressing, you can customize your sweatshirt by adding patches, embroidery, or tie-dye. Layering with other fabrics or using fabric paint can also enhance the vintage look. Explore our creative methods section for innovative ideas!
Q: How do I properly care for my distressed sweatshirt after customizing it?
A: To care for your distressed sweatshirt, wash it inside out to minimize fraying and avoid using bleach or harsh detergents. Air drying is recommended to maintain its shape and style. Read our washing tips for further care instructions to keep it looking fresh.
Q: Can I repair areas of my sweatshirt that have become too distressed?
A: Yes, you can repair overly distressed areas using fabric patches, sewing, or even decorative stitching. This can add character while ensuring your sweatshirt remains wearable. Check our section on repairing distressed areas for helpful techniques.
Q: What common mistakes should I avoid when distressing my sweatshirt?
A: Common mistakes include over-bleaching, uneven distressing, and using the wrong tools. Practice on a scrap piece if you’re unsure. For more tips on avoiding these pitfalls, refer to our common mistakes section in the article.
Q: How can I style my distressed sweatshirt for different occasions?
A: To style your distressed sweatshirt, pair it with high-waisted jeans for a casual look, or layer it over a collared shirt for a smart-casual vibe. Accessories like hats and sneakers can further enhance your outfit. Visit our styling section for more ideas on maximum impact.
In Conclusion
Congratulations on your new DIY vintage sweatshirt! By following these simple steps, you’ve not only given your hoodie a fresh and trendy look but also personalized it to match your unique style. Now that you’ve got the basics down, why not explore our guide on styling tips for hoodies or check out our detailed care guide to keep your favorite piece looking great? Don’t forget to share your creation with us in the comments below-we love seeing your personalized projects!
Feeling inspired? Dive into more creative projects like tie-dye techniques and embroidery ideas to elevate your casual wear even further. If you’re not already subscribed, sign up for our newsletter for more tips and exclusive content that celebrates hoodie culture! Remember, customizing your wardrobe is just the beginning of expressing yourself. Embrace comfort, let your creativity flow, and wear your style with confidence!


