✨ This article was AI edited. Editorial responsibility: CoolestHoodies.com.
Produced with AI. This article was artificially generated. Editorial responsibility: CoolestHoodies.com.
How do you sew a sweatshirt? To sew a custom sweatshirt, use medium-to-heavyweight cotton fleece (280–380 GSM) and matching 2×1 rib knit for cuffs and neckbands. Sew using ballpoint or stretch needles (size 80/12–90/14) with a narrow zigzag or 4-thread overlock serger stitch. Stabilize shoulder seams with clear elastic to prevent neckline sag.
Sewing your own sweatshirt is one of the most rewarding milestones in garment construction. A handmade fleece crewneck or raglan pullover delivers custom sizing, superior fabric weight, and tailored proportions that off-the-rack garments rarely match. However, heavy knitted textiles behave very differently from woven cottons—they stretch, curl at cut edges, and can easily jam standard home sewing machines if approached with incorrect needle geometry or stitch tension.
In this detailed sewing masterclass, we demystify the mechanics of knit apparel assembly. From needle selection and differential feed calibration to flawless neckband calculation and bulk reduction, this guide equips you with the exact techniques professional sample makers use to produce store-quality fleece pullovers.
Essential Materials & Textile Selection
The foundation of a durable, high-retention sweatshirt lies in selecting compatible main body and trim fabrics:
- Main Body Fabric: Choose 280 to 400 GSM (grams per square meter) fabric. For classic winter pullovers, select brushed cotton-polyester fleece. For breathable year-round wear, opt for 100% organic cotton French terry or unbrushed loopback cotton with at least 25% two-way mechanical stretch across the grainline.
- Trim Fabric (Cuffs, Neckband & Waistband): Never use main fleece for bands and cuffs; it lacks sufficient elastic recovery. Always source dedicated 2×1 or 1×1 tubular rib knit containing 4% to 8% spandex/elastane. Rib knit must boast at least 70% stretch with immediate 100% snap-back recovery.
- Needle Selection: Never sew fleece with a sharp Universal needle! Sharp needles slice through the interlocking yarn loops, creating tiny micro-holes that blossom into vertical fabric runs after the first wash. Instead, install a Ballpoint (Jersey) or Stretch needle (Schmetz size 80/12 for midweight French terry; size 90/14 for dense 380 GSM fleece).
- Thread: Use 100% all-purpose polyester thread (such as Gutermann Sew-All). Polyester fibers possess natural elongation, flexing alongside the knit fabric without snapping. Avoid 100% cotton thread on stretch seams.
| Machine Type | Recommended Stitch | Needle Specification | Presser Foot | Seam Stabilization |
|---|---|---|---|---|
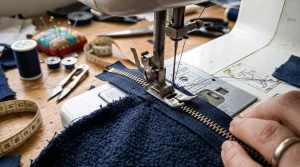
| Standard Domestic Sewing Machine | Lightning stretch stitch OR Narrow Zigzag (Width: 0.8mm, Length: 2.5mm) | Stretch 90/14 | Walking foot (Even feed foot) | Clear elastic along shoulder seams |
| 4-Thread Serger / Overlocker | 4-Thread Mock Safety Stretch Stitch | Ballpoint Serger Needles 80/12 | Standard Serger Foot (Differential Feed 1.3–1.5) | Knit stay tape or clear elastic |
| Coverstitch Machine (Finishing) | Wide 2-needle or 3-needle cover hem | ELx705 System 90/14 | Clear front coverstitch foot | Wash-away wonder tape for hems |
Step-by-Step Construction Master Sequence
Follow this battle-tested assembly order to keep garment handling flat and manageable:
Step 1: Stabilize and Join the Shoulder Seams
Shoulder seams bear the full suspended weight of the sweatshirt and hood. Without stabilization, shoulder seams quickly stretch outward and drop down the bicep. Cut two strips of 3/8-inch clear swimsuit elastic or cotton twill tape matching the front shoulder length. Place the front and back bodice pieces right sides together, sandwiching the elastic tape along the back seam allowance. Stitch using a stretch stitch or serger, trimming excess tape flush with the neckline.
Step 2: The Golden 80–85% Neckband Rule
The single hallmark of an amateur handmade sweatshirt is a wavy, gaping neckline that refuses to hug the clavicle. To achieve a perfectly flat neckband:
- Measure the total interior circumference of your assembled front and back neckline on stitch lines (e.g., 20 inches).
- Multiply this circumference by 0.80 (for high-stretch rib knit with spandex) or 0.85 (for 100% cotton rib). For a 20-inch opening, cut your ribbing strip 16 to 17 inches long plus 1 inch total seam allowance.
- Join the short ends of the ribbing strip right sides together with a 1/2-inch seam allowance to form a closed ring. Press the seam open with an iron.
- Fold the ring in half lengthwise with wrong sides facing, pressing a crisp center crease.
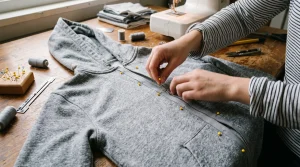
- Divide both the sweatshirt neckline and the folded neckband ring into four equal quarters using pins or tailor chalk.
- Pin the band to the right side of the neckline, matching the four registration points (placing the band’s seam at the center back or left shoulder).
- Sew around the neckline, stretching only the neckband between pins to match the longer sweatshirt neckline. Never pull or stretch the fleece body! Press the seam allowance downward toward the body and optionally topstitch 1/8 inch away with a twin needle or coverstitch.
Step 3: Insert Sleeves Flat
In tailored shirtmaking, sleeves are inserted into a closed cylinder. In fleece knitwear, the industry standard is flat sleeve insertion. Lay the bodice open flat, right side up. Align the center top of the sleeve head with the shoulder seam, right sides together. Pin outward toward both underarms and stitch in one continuous pass. Repeat for the opposite sleeve.
Step 4: Continuous Side and Sleeve Seams
Fold the sweatshirt so the front and back bodice pieces are right sides together. Pin along the underarm seam, taking care to cross-pin the underarm sleeve-to-body seam intersection perfectly so the cross-seam meets. Sew from the sleeve cuff opening down through the armpit and along the side seam all the way to the bottom hem in a single continuous line.
Step 5: Attach Cuffs and Waistband
Calculate your cuff and waistband lengths using the same 80–85% ratio against their corresponding openings. Form closed rings, fold wrong sides together, divide into quarters, and serge into the circular sleeve and waist openings while stretching the ribbing to fit.
Advanced Techniques & Modifications
Once you master basic crewneck construction, you can adapt the base block for custom styling:
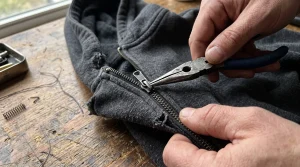
- Adding a Front Zipper: Transform your pullover into a zip-up fleece jacket by following our companion tutorial on how to add a zipper to a hoodie, including fusible interfacing stabilization along the center front opening.
- Vintage Distressing: If you prefer a broken-in, retro streetwear aesthetic, see our guide on how to distress a sweatshirt with sandpaper, pumice stones, and micro-fraying at the rib seams.
- Preventing Machine Tunneling: If your domestic machine creates a puckered “tunnel” ridge down the center of twin-needle hems, loosen your top thread tension by 1.0 to 1.5 numbers and insert water-soluble stabilizer tape between the fabric layers before stitching.
Frequently Asked Questions
Can you sew a sweatshirt without a serger or overlocker?
Yes. A regular domestic sewing machine can easily sew fleece using a narrow zigzag stitch (0.5mm to 1.0mm width and 2.5mm length) or a dedicated stretch “lightning” stitch. Because knit fleece and French terry do not unravel like woven cotton, raw seam allowances do not require serging to remain structurally sound.
What is the best needle size for sewing heavy hoodie fleece?
For midweight French terry (280–320 GSM), use a Schmetz Stretch or Jersey Ballpoint needle size 80/12. For heavyweight, thick winter fleece (340–420 GSM), step up to a Ballpoint size 90/14 or 100/16 to prevent needle deflection, skipped stitches, and bent needles.
Why does my sweatshirt neckline stick out and gape?
Neckline gaping happens when the neckband strip was cut too long or when the sweatshirt neckline fabric was accidentally stretched during sewing. Always cut your rib knit neckband 15% to 20% shorter than the neckline measurement, and gently stretch only the ribbing while sewing.
Get our latest guides, news, and insights highlighted in your Google Search & AI Overviews.